|
512-220-8891 |
 |
 |

| 3701 Basford Rd. Austin, TX 78722 | 512-220-8891 |
|
|
Whole-House Remodel & Master Suite Addition
|
|
|
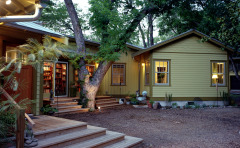
Master Suite Addition w/ Protected Tree
|
Courtyard
|
| Scroll over photos for before shots |
The back of the lot was quite park-like with many pecan trees, one a “protected tree” (by virtue of it being over 19” in diameter) according to our city tree ordinance, and they wanted that to be a part of their daily life, not just a weekend mowing or leaf raking job.
The house had been divested of its front porch some years before (above left) and they knew they wanted another porch to hang out on and interact with the neighbors. Their desire for a one story, along with existing setbacks and driveway, left only the back of the house on which to add space for the reconfiguration.
The existing kitchen was located on the front west corner of the house and, subject to solar gain, always heated up just at the time our clients arrived home from work and started thinking about dinner.
The back of the house is dominated by a large mature pecan tree (30” diameter - see before, above right photo) which shades a full half of the property. It also inhibited any ideas for an addition which the homeowners contemplated. Our city loves its trees (note the outcry over the proposed cutting of heritage trees at the city swimming hole) and our clients are no exception. They expressed a strong desire to incorporate nature in their home and insisted that any addition celebrate the tree; we were happy to find clients who share our values. After meetings with several Consulting Arborists, who declared our tree a good candidate to build around, we went ahead with our plans.
 |
 |
|
|
Existing Bungalow w/ Tree to right |
New Plan w/ Tree-Hugging Gallery Leading to Master Suite |
Functional Solution
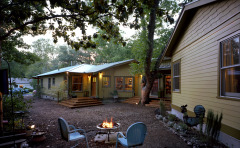
Our clients had read about our architect when he participated in Austin’s anti-McMansion task force, and they liked his fun-loving style. He took our drawings of the existing space and a suggestion to move the kitchen to the back of the house, and many schematics and much feedback later, we arrived at a creative layout that maximized use of space, separated public from private areas, and allowed for lovely outdoor rooms. The entertainment courtyard (center and right photos, top of page) has great circulation via the gallery and the mudroom, allowing guests watching movies on the outdoor projection screen to refresh their drinks and return easily to the stadium seating provided by the wide deck stairs. The gallery, lined with bookshelves on one side and sliding glass doors to the courtyard, hugs the tree (below left and center)as it leads to an angled Master Suite which was key to keeping the open feel of both the interior of the house and the entire back yard.
 |
 |
 |
|
Gallery Leading to Master Suite |
Gallery Bookcases w/ Glass Block |
Master Bedroom |
We took the architect’s schematics and created Construction Documents (building plans) for the project, detailing the foundation plan, walls, elevations, rooflines, framing, electrical, cabinets, masonry, and timber framing details.
Challenges
The project had to be accomplished in phases due to the homeowners’ desire to live in a trailer on the property during construction. First a workshop needed to be constructed at the back of the property (below ; manspace for the man of the house. This allowed us to empty the old garage of tools and years of accumulated stuff, in order to tear it down to make room for the addition. Once the garage was gone, we were able to move in a trailer for the homeowners’ living quarters during the project. Then the house could be emptied, with most belongings going to the workshop and the overflow to friends and family. After all this was accomplished, we moved on to demolition and construction of the main house and addition.
A Certified Arborist gave us a Tree Protection Plan according to city permit requirements. We had already changed the foundation from slab on grade to pier and beam at the suggestion of the consulting arborists and we used steel beams at the gallery to eliminate most footings close to the tree. Because the lot sloped up to the back, this required stepping up the floor platform to maintain the required distance from grade to the untreated plywood and allow access space under the subfloor. We implemented required tree protection which noted that any pruning had to be approved by a Certified Arborist. This meant both tree limbs and roots. Because we had to dig twenty-eight piers to support the addition, we knew that we would encounter major roots somewhere along the way. We invested in an Air Spade device, which blows dirt out of the holes we had to dig deep into the clay soil, while leaving even the finest roots intact.
 |
 |
 |
|
Foundation Piers |
Excavation moved to miss Roots |
Platforms stepped up for crawlspace |
Our engineer specified two foot by two foot by three foot deep footings to support the ten inch piers and in digging them, we encountered major roots under a number of critical point loads. We managed to install the foundation without cutting a single root over 1” in diameter by moving footings where we could, modifying others, and by installing bridge footings over major roots on the footings that could not be moved. (See photos). The air spade is truly a valuable tool for this kind of work because when using a pick or shovel, most roots are discovered by hitting them and causing irreversible damage.
|
Roots exposed under point load without cutting or damage. |
Using the Air Spade to expose roots
|
Bridge Footing carrying point load around protected roots. |


During the time that we developed the project, code changes went into effect that called for fire-resistant materials to be used on any overhangs more than 12” into the side yard setback. We worried that we could not match the exposed tails of the existing house if we were forced to use a cement based soffit and fascia type material to meet code. We solved the problem and met code by finding a fire-resistant paint which served as primer in all overhang areas in the setback.
A tacked-on entry to the north side had to be completely reframed so the floor heights matched and a low ceiling beam was raised to allow for what became the office.
Angled lot lines made our straight extension of the kitchen wall come very close to the side-yard setback. Not wanting to reduce the length of the kitchen, we stepped the wall in 2” on the outside, giving us enough heel height to use 2x6 rafters that planed out with the existing 2x4 roof.
Project Aesthetics
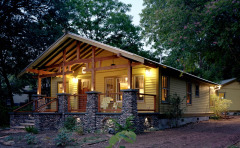
While our clients are very warm and fun-loving, the husband has more traditional tastes than his wife’s more eclectic style. He has a strong interest in the Far East, having grown up in Japan and making frequent work trips to China. He also is quite a good woodworker and he asked us to incorporate timber framing along with riverstone masonry on the front porch. It seemed natural to look for inspiration from the Greene brothers, fine craftsmen and designers whose vision was stimulated by the Asian influence emanating from the newly opened Japan at the end of the nineteenth century. Their Blacker House inspired the timber framing we created for the front porch.
We matched the rhythm of the existing rafter tails and 1x6 beveled roof decking and matched the roof plane over both the kitchen extension and the front porch. Inside both areas, however, we raised the ceiling, creating a dramatic contrast to the lower ceilings of the dining and living rooms. The kitchen cable lighting accommodates task and ambient lighting with separate switches in the same run, as they share the neutral leg. Our intent was to create longer sight lines yet have varied ceiling heights and lighting schemes to add interest. It was during the modeling of the project that we noticed that the architect placing the master suite addition on a 45 degree angle produced even greater sight lines than we had first imagined, one of which extends from the Master Bedroom through the courtyard all the way to the front door, well over seventy feet! The result is a much more expansive feel to what is still a modestly sized house.
 |
 |
 |
|
Timber Arches & Stone Arches |
Timber Framing |
New Site Line from Entry |
Door and window moldings are the same throughout the house, 5/4 head casing mortised to house the ¾ side casing. Custom crown was milled to add a subtle Craftsman touch to the living and dining rooms. The moldings were painted the same while the wall color varies playfully from room to room.
We used local, Texas Rustic grade Mesquite for flooring in major rooms throughout the house, tying the Master Suite and the kitchen addition to the existing space. The rustic holes were filled with a black epoxy to add character to what otherwise could have looked monotonous. We changed to a square end-grain mesquite flooring in the office, giving even more interest to the floors when the frosted glass pocket door is open.
Exterior walls changed from horizontal clapboard to a vertical board and batten in the courtyard, to honor the tree and give an uplifting feel to that space.
In general, the house presents a more traditional face to the street and becomes more eclectic, fresh, and surprising as you move to the back.
Details
It is important to us to let natural materials be used to their best advantage.
The New Mexico riverstones had a wonderful range of colors, so we used them over the more local (local is always our first choice) limestone for the front porch. It was not the easiest masonry job we’ve done; without mortar to hold them in place, it was much like stacking marbles a few at a time, until the concrete placed behind them held them securely. We later grouted the stones with a charcoal sanded grout to make them pop. The end result is far superior to a standard mortared joint and the eyebrow downlights in the arches and along the stone entry staircase make for a wonderful play of light in the evenings.
We tiled the porch column caps with a one inch square glass mosaic tile that echoes the square cattle-panel rail yet contrasts nicely with the round riverstone in both size and color.
The timber framing was planned so the roof planed out with the existing roofline and still gave enough headroom, without sacrificing any grace in the cloudlift beam or the gun-stock queen posts. There are through-mortises in the posts for the lower beams, the rafter beams are birdsmouthed with a tenon and the whole bent is pegged mortise and tenon construction.
 |
 |
 |
It was important to us not to throw the existing framing in the landfill. We were able to save the old floor, walls, roof, and even the HVAC system in the existing space by upgrading the envelope using high efficiency windows as well as blown cellulose to R-38 in the attic, wet-pack blown cellulose in the walls, Icynene foam insulation in the cathedral ceilings, and R-19 fiberglass batt in the floors.
The kitchen features recycled materials in the Paperstone countertops and the aluminum tile backsplash. The cabinets were locally made and a standard frame and flat panel design, but we increased the width of the stiles and rails to give it a more contemporary look. The kitchen is fun and colorful with the back of the open cable lights spreading a subtle rainbow hue over the cathedral ceiling.
Even the cats have their own custom cabinetry with food and water bowls behind glass doors (below left). Their dog-free dining area is accessed through a small hole in the side of the bookcase. The master bedroom has cat shelves installed under the window stool for lounging in the sun.
 |
 |
 |
We used 12” glass block to create windows in the bookcases, set in site-built jambs and cased to match the other windows.
We upgraded all the windows in the house using clad sashes (interior primed) in wood frames and old-school thick sills. We used trim-head screws to case them on site using pre-primed 2x4 fir, to give them the look of old windows (no extruded aluminum frames), with the functionality of clad sashes (no painting those divided lights).
The front door has a cloudlift pattern that echoes the main beam over the porch, and it is distressed and stained to give it an older look.
We took the scrap Hardiboard siding cutoffs and created our own shingles for the gable siding. We were able to create a pleasing classic pattern, panels of which are not available in our area unless special ordered in large quantity.
We removed the water heater closet to open up the house and installed a tankless water heater near the new Master Bath that serves the entire house. Since the existing bathroom was sixty feet away, we installed a circulation system to service it and the re-located Kitchen, so as not to waste water waiting for it to get hot. The circ pump is fed by an electric water heater and the pump is timed to come on when the homeowners are most likely to be using it. The combo timer and manual on/off switch is located outside the Master Bedroom door. The pump works only when the programmable timer is on and an aquastat on the return line falls below the set temperature. When faucets are opened, the circulation lines provide the initial hot water until the tankless heater kicks in, through the electric heater, to provide hot water on demand. By using an electric water heater, a timed pump, and an aquastat, this system saves money, saves water, maintains the tankless warranty, and adds convenience.
Since we created the CAD model, drew the plans, and performed the framing and finish carpentry with familiar subcontractors, we were able to make sure there was just enough room for an equal and pleasing overhang to all the head casings, without wasting any space and keeping equal window and cabinet sizes. That is the beauty of modeling the project with CAD software; the computer becomes one of the most useful tools in the toolbox. Our laptop was rolled out almost every day to assist in layout of the project. We matched roof planes with ease and we knew from day one what the project would look like. There is just no substitute for an accurate CAD model. The control over the fine details all the way through the project has a cumulative effect that really shows in the finished product.
Coming to Life
We were pleased to attend our homeowners’ “Coming Out Party” a while ago. It celebrated their coming out of the trailer, and the many months of anticipation leading to the first showing of their new house to friends and family. It was so rewarding to see all our hard work come to life; laughter and conversation in four different areas of the house rising to a crescendo at times, filling the space with joy and camaraderie. We are gratified to remain a part of all that.

|
Copyright (c) All Right Reserved 2009